Basic Navigation Setup
Perfect for single focus assets ranging in scale from an object to a building.
Part of the UE5 Navigation Template smooth controls for architectural visualization.
When to Use Basic Navigation
- Single building applications
- Product configurators
- Simple architectural visualizations
- Indoor showroom experiences
- Focus on a single asset or structure
Complete Setup Guide
Follow these steps to set up Basic Navigation in your project:
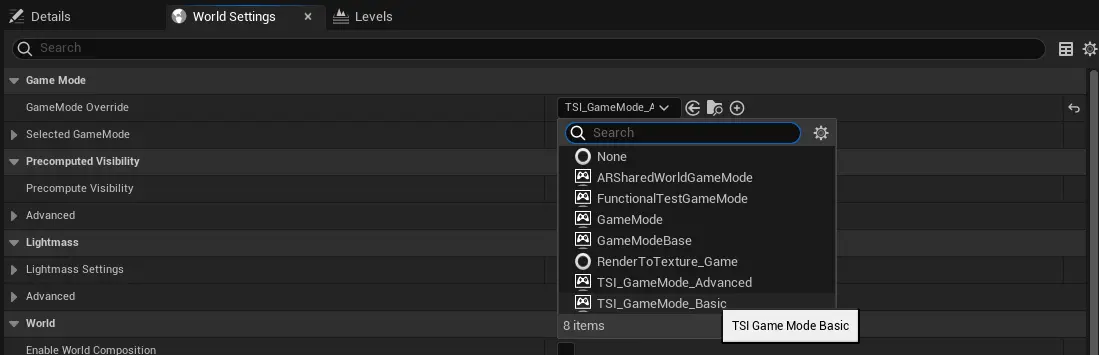
Step 1: Set Game Mode
- Open your Unreal Engine level
- Navigate to Window > World Settings
- Set your Game Mode to
TSI_Gamemode_Basic
This will automatically configure:
- Appropriate player character
- Player controller
- HUD class
Step 2: Configure Collision Channels
To enable click-to-move and object selection, create custom collision channels.
Create Collision Channels
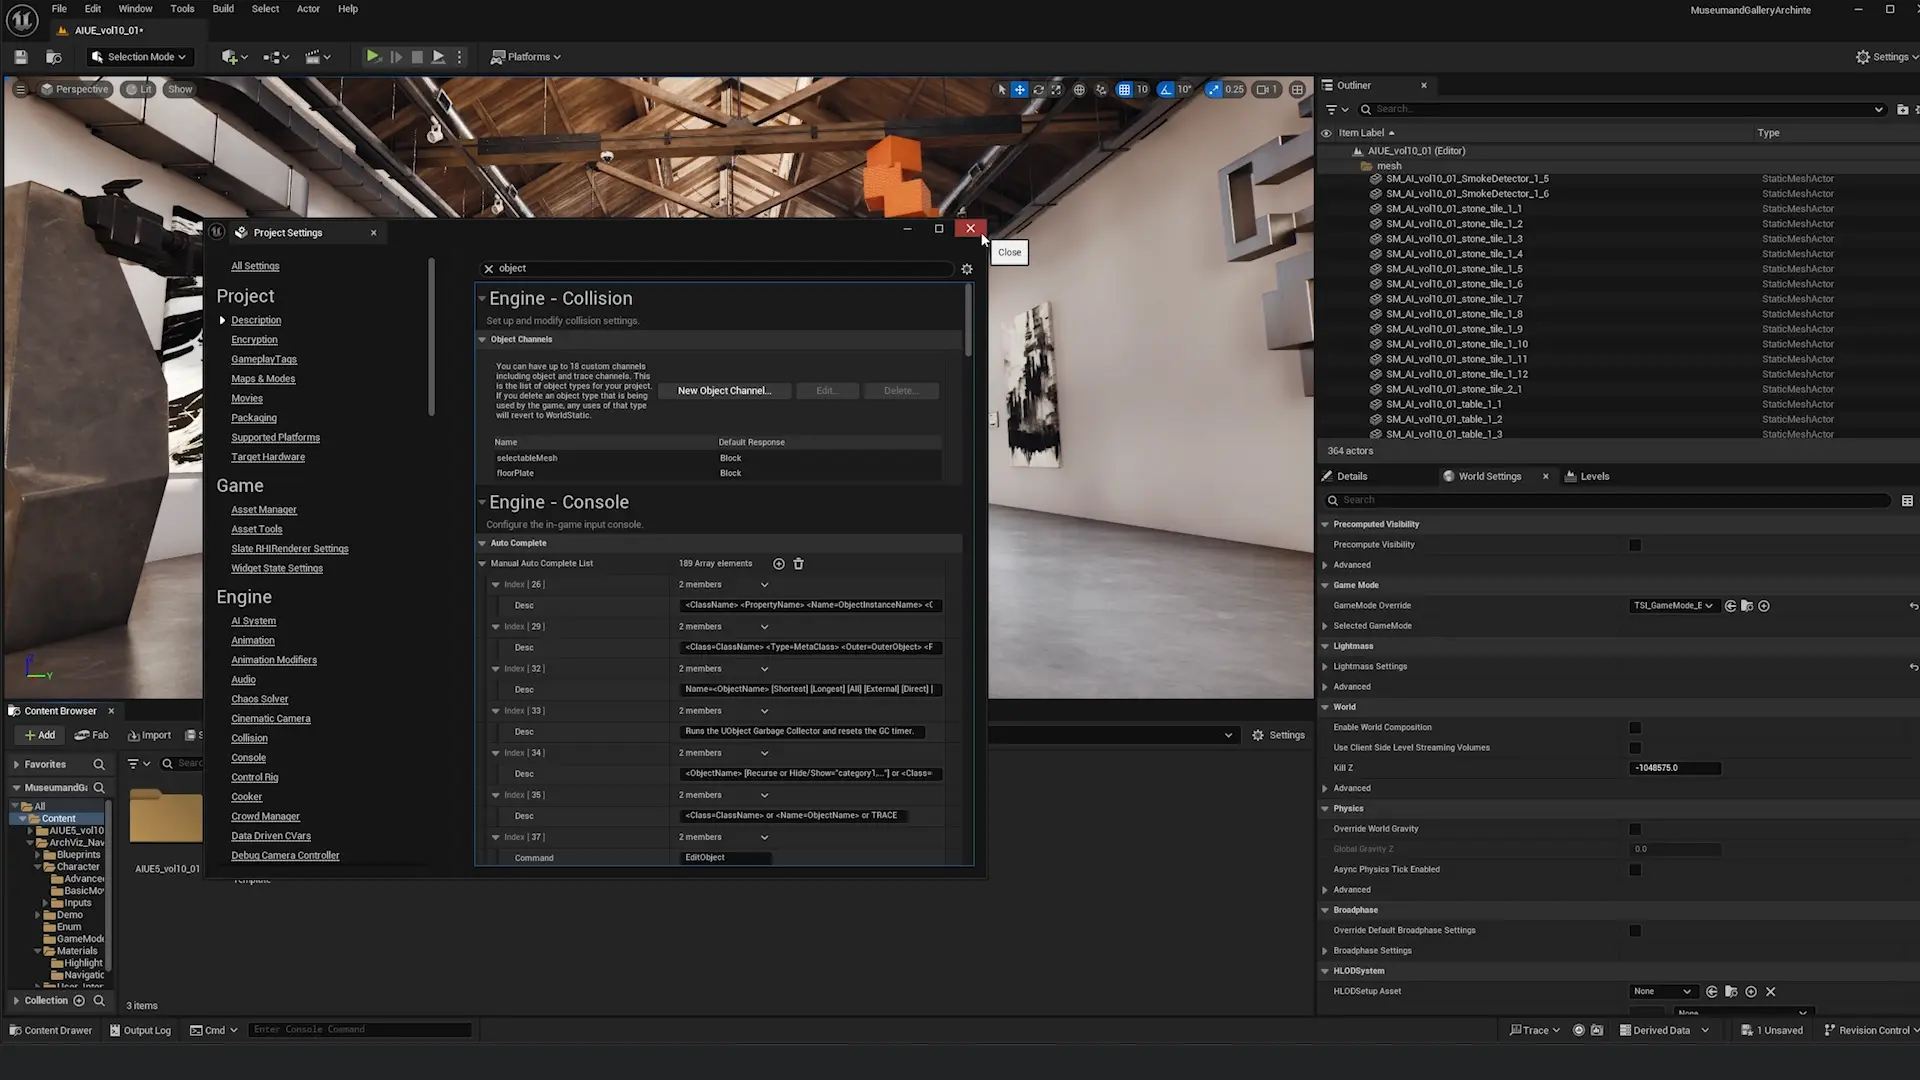
- Open Edit > Project Settings
- Search for "object"
- Navigate to Engine > Collision > Object Channels
- Click New Object Channel
- Create two channels:
- Name:
SelectableMesh| Default Response: Block - Name:
FloorPlate| Default Response: Block
- Name:
Note: These collision channels are essential for the navigation system to detect clickable floors and selectable objects.
Step 3: Assign Floor Collision
For click-to-move functionality, assign collision to all walkable surfaces.
- Select all floor elements in your scene (tiles, ground planes, etc.)
- In the Details panel, search for "collision"
- Set Collision Presets to Custom
- Set Object Type to FloorPlate
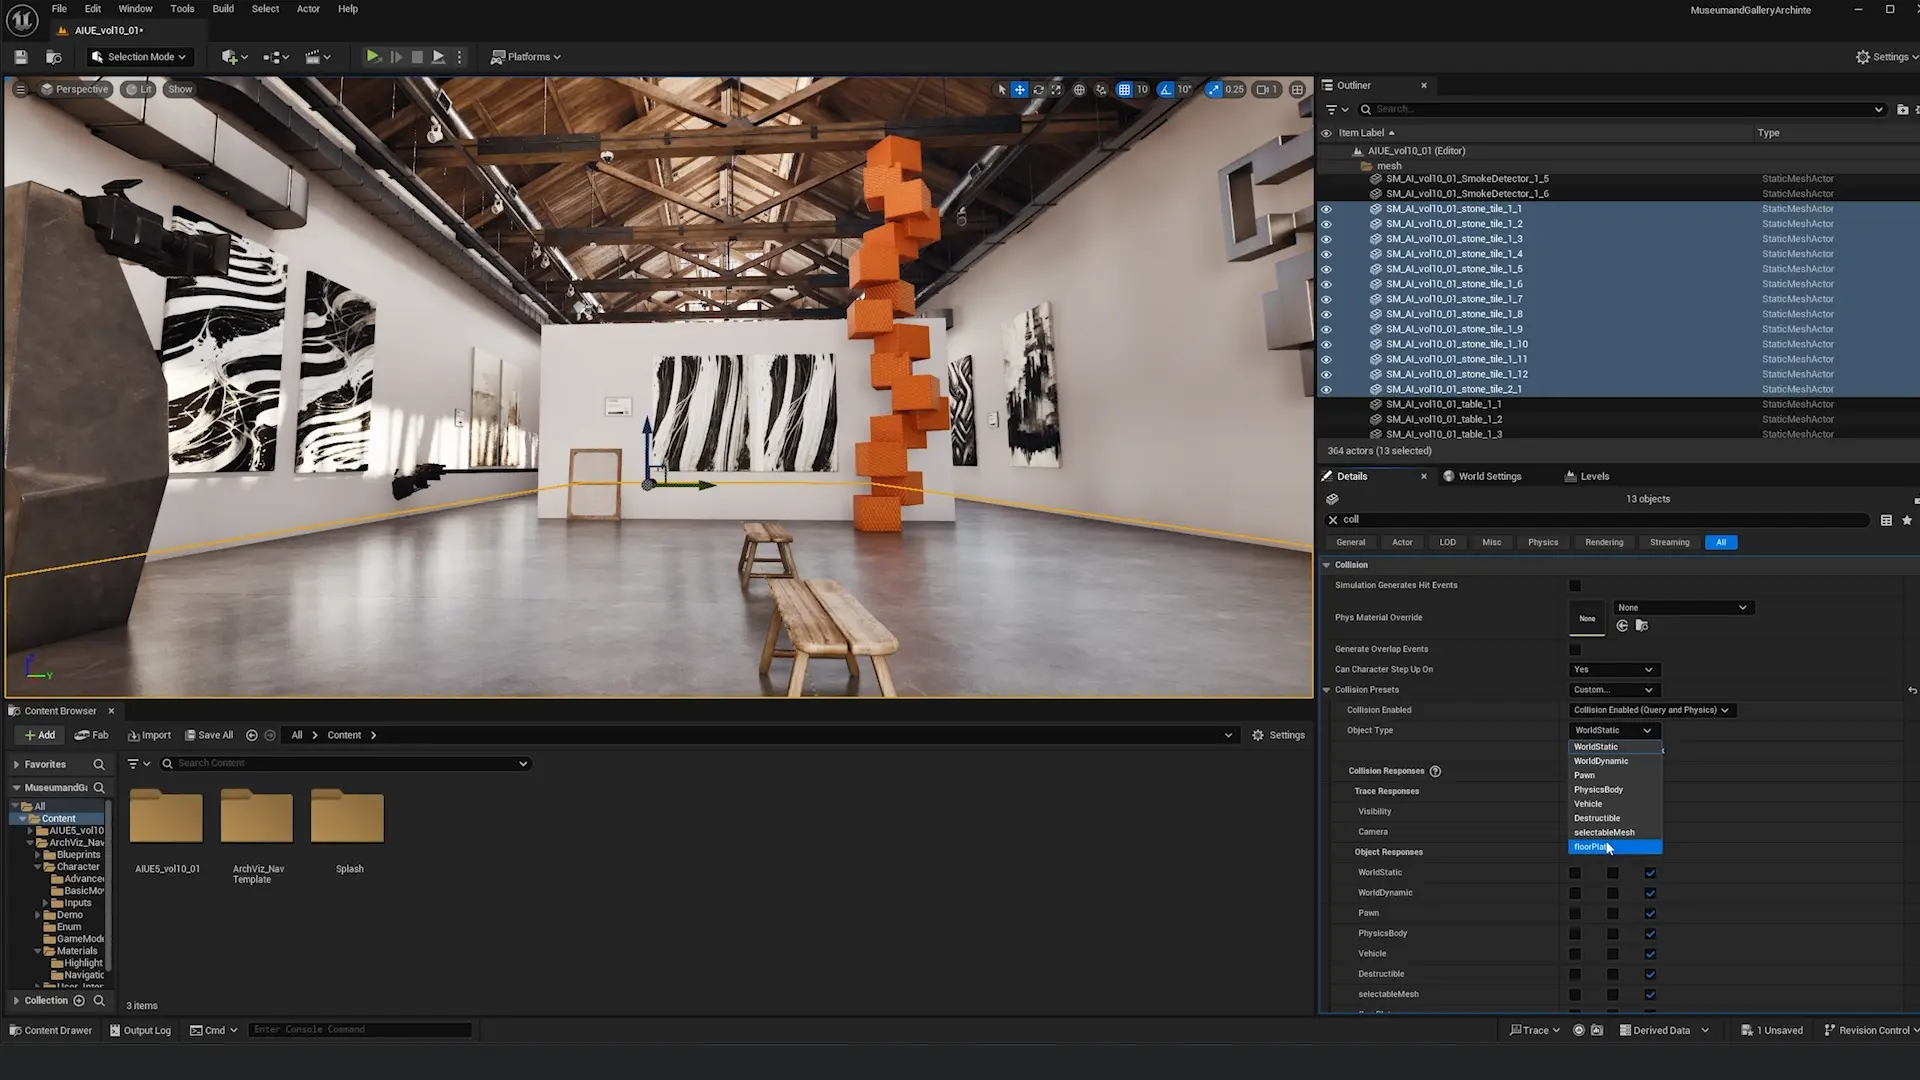
What to tag as FloorPlate:
- Floor tiles
- Ground planes
- Walkable surfaces
- Stairs and ramps
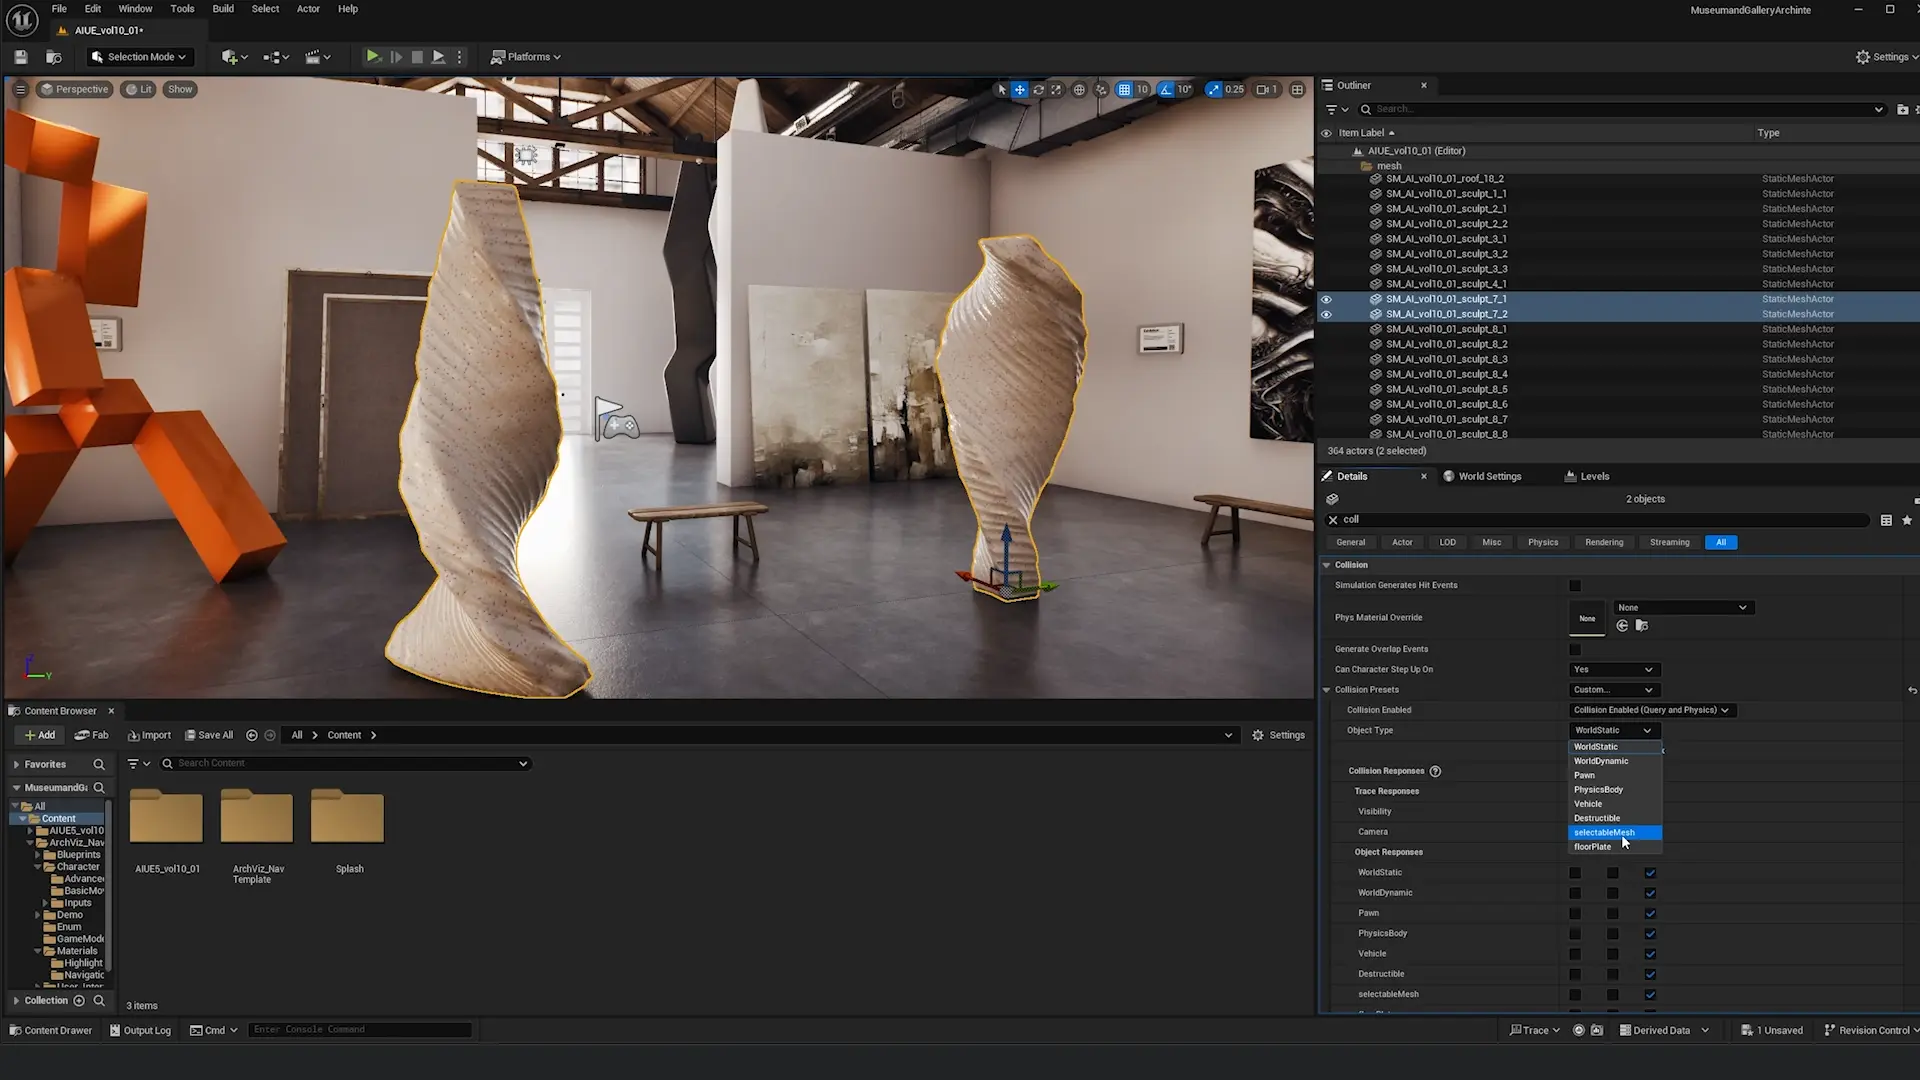
Step 4: Assign Selectable Mesh Collision
For object selection and highlighting:
- Select objects you want to be selectable (furniture, walls, features, etc.)
- In the Details panel, search for "collision"
- Set Collision Presets to Custom
- Set Object Type to SelectableMesh
Step 5: Add Player Start
The Player Start actor defines where the camera spawns.
- Click the + icon in the toolbar (Place Actors panel)
- Search for "Player Start"
- Drag it into your scene
- Position it at your desired spawn location
- Rotate it to set the initial camera direction
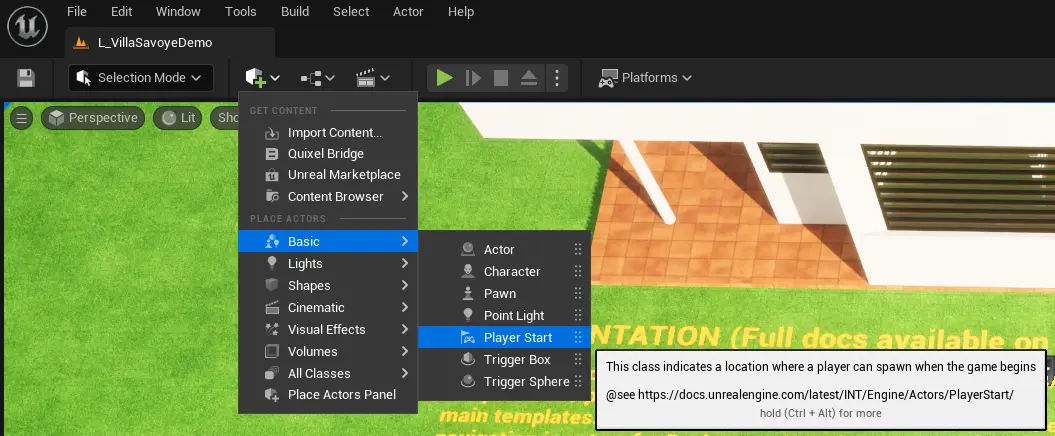
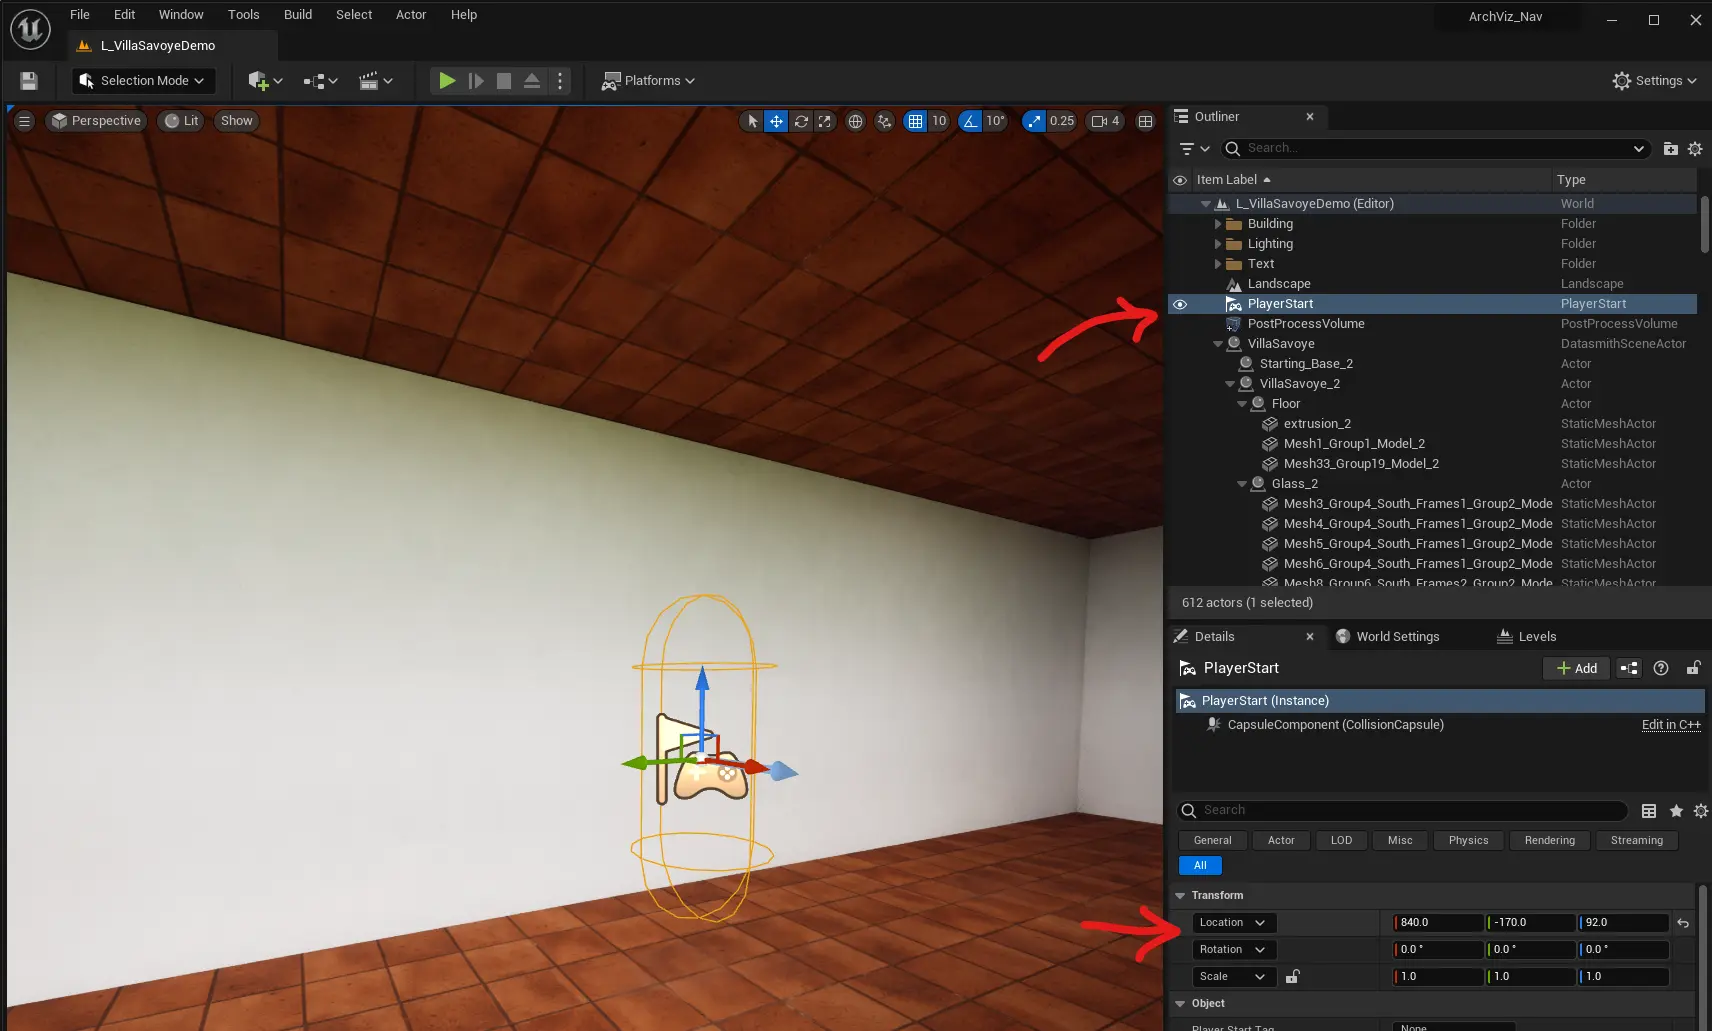
Tip: Center the Player Start in your building for the best initial view.
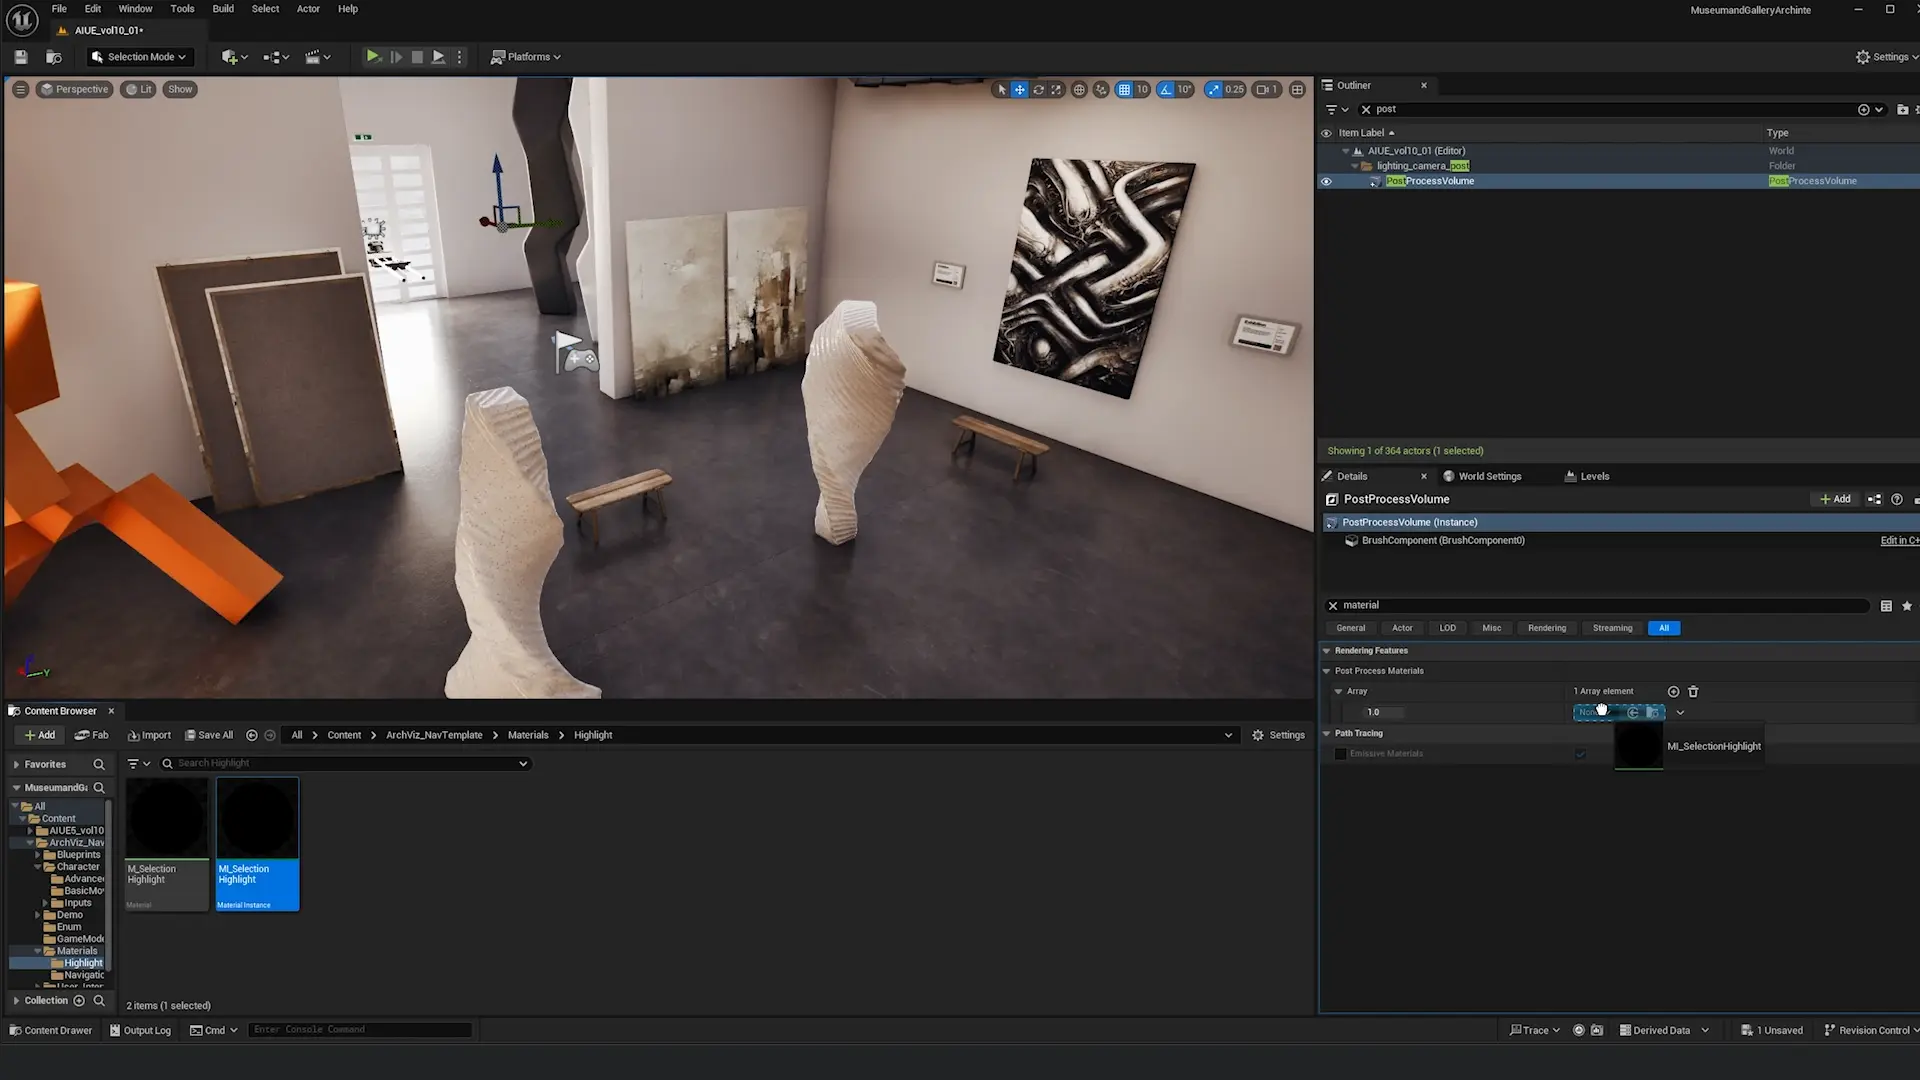
Step 6: Configure Selection Material
Create a visual highlight when hovering and selecting objects.
Add Post-Process Material
- Locate your Post Process Volume in the Outliner
- If you don't have one, add one: Place Actors > Post Process Volume, then enable Infinite Extent
- In the Details panel, search for "material"
- Find Rendering Features > Post Process Materials
- Click the + dropdown to add a new array element
- Choose Asset Reference
Select Highlight Material
- Click the asset selector
- Navigate to:
ArchvizNavigation/Materials/Highlight/ - Select MI_SelectionHighlight
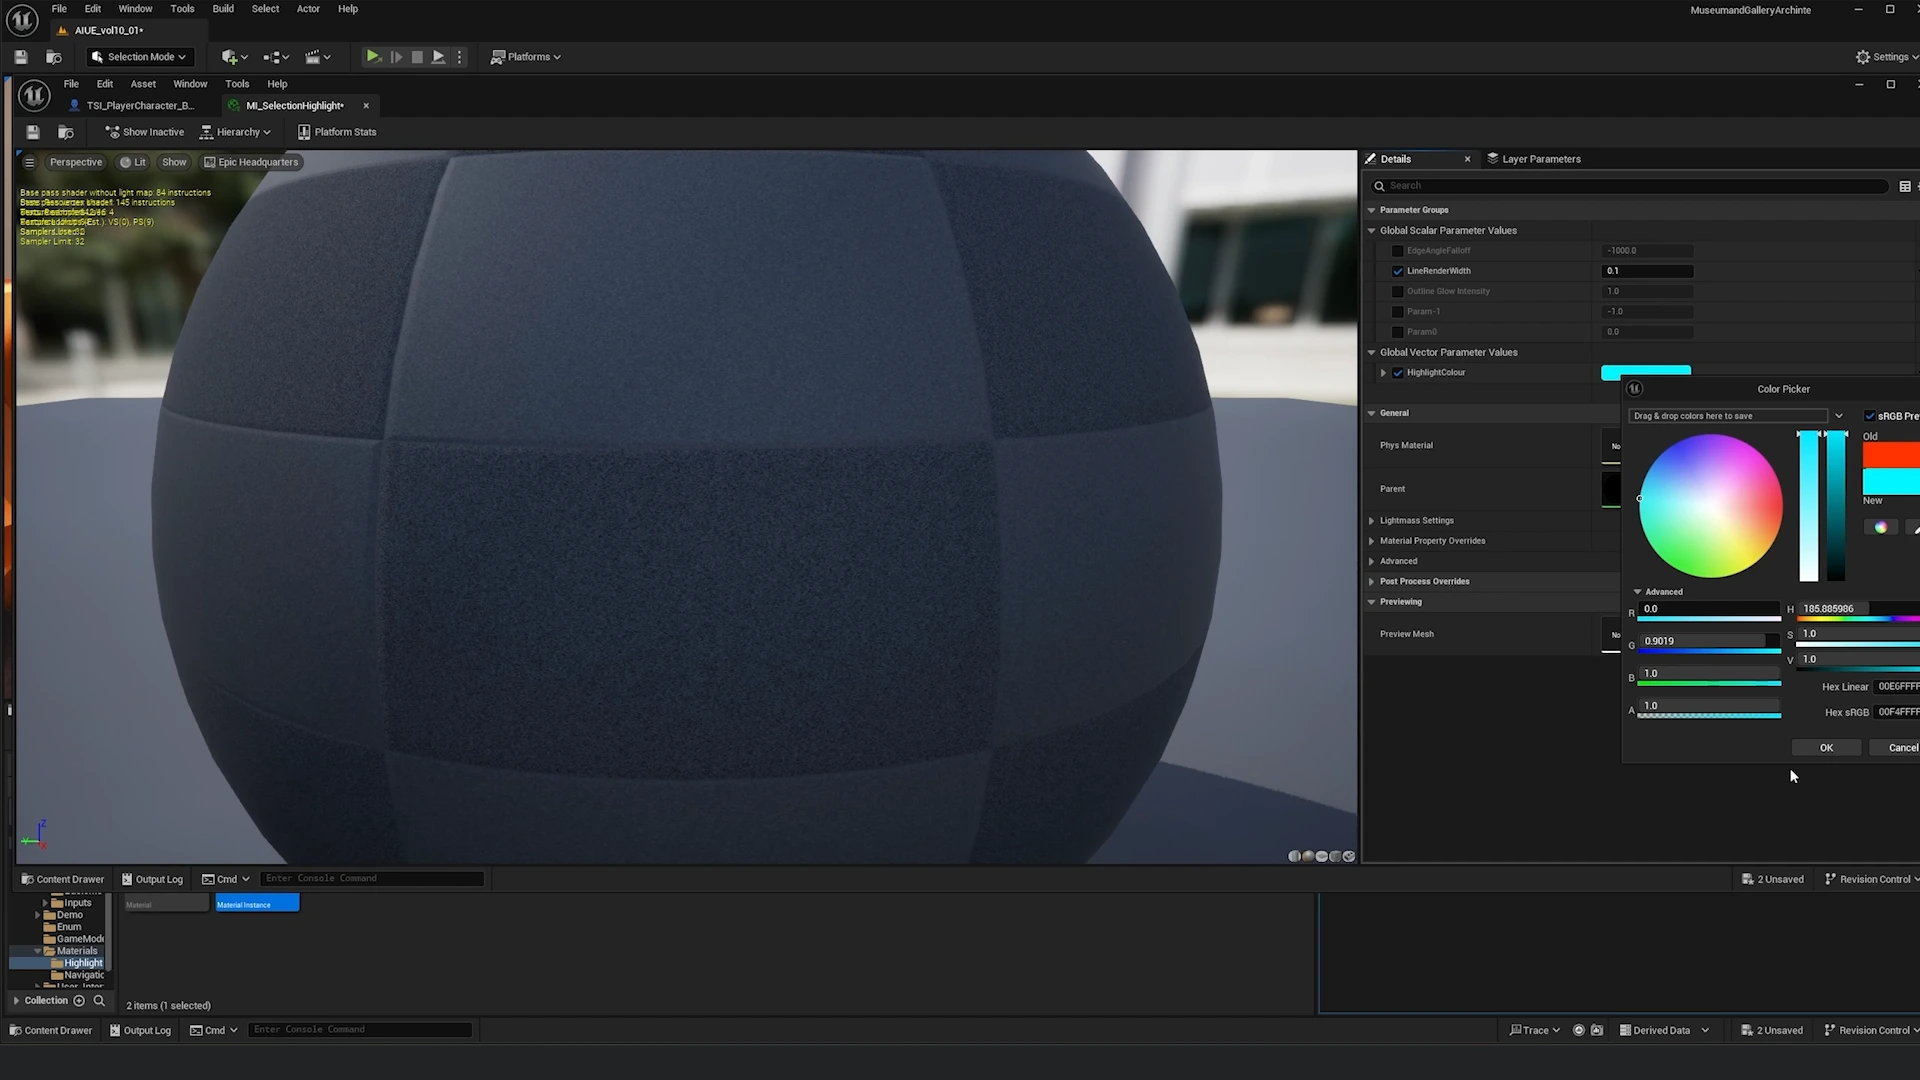
Customize Highlight Color (Optional)
To change the highlight color:
- Open MI_SelectionHighlight in Content Browser
- Adjust the following parameters:
- Highlight Color - Main selection color
- Line Width - Thickness of outline
- Falloff - Edge softness
- Glow Intensity - Brightness of effect
- Save the material
Step 7: Test Your Setup
Press Alt + P (or click Play) to test your navigation:
Third Person Mode (Default)
- Left Mouse Button - Orbit around focused point
- Right Mouse Button - Pan camera
- Mouse Wheel - Zoom in/out
- Click Object - Focus and lock orbit to object
- Hover Object - Highlight object
First Person Mode
- F Key - Switch to first person
- Left Mouse Button - Look around
- Right Mouse Button - Strafe (forward/backward/left/right)
- Click Floor - Move to location
- Mouse Wheel - Change FOV (zoom)
Verify:
- ✅ Camera spawns at Player Start location
- ✅ Objects highlight when you hover over them
- ✅ Clicking objects focuses camera and locks orbit
- ✅ In first person, you can click floor to move
- ✅ Camera transitions smoothly between modes
How It Works
The basic navigation system relies on a camera attached to the pawn via a spring arm:
- The camera is always focused on the pawn which is at the centre of the screen
- Zooming increases/decreases the length of the spring arm
- This creates smooth zoom into the centre of the screen

Camera System
The spring arm-based system provides:
- Consistent center-screen focus
- Smooth zoom in/out
- Automatic collision detection
- Natural camera movement
Troubleshooting
Having issues? See the Troubleshooting Guide for detailed solutions to common problems:
- Can't Click to Move
- Objects Not Highlighting
- Falling Through Floor
- Camera Issues
- Performance Problems
Next Steps
- Selection System Details →
- Troubleshooting → (Common issues and solutions)
- Advanced Navigation → (For larger scale projects)